Lifecycle stages are a key part of inbound marketing used to describe where people are in their journey to becoming a customer. We often find that applying a consistent lifecycle stage approach is a quick win to help our clients improve their lead-nurturing strategy. If you understand where your prospects are in relation to becoming clients, then you can make logical choices about nurturing them as leads.
HubSpot, whether in their sales, marketing, or service products, offer hardcoded lifecycle stages as a property type so marketers and sales teams can easily assign lifecycle stages to individual contact records within your database. But how do you determine which contacts should be assigned to each stage? And what do you do with this information afterward? Answering these questions are common challenges for many businesses.
As a Platinum HubSpot Solutions Partner, Raka has helped numerous businesses gain a better understanding of how lifecycle stages work and how they can be applied within HubSpot to increase conversions and sales. We’ll walk you through each step in this blog post, or you can jump to the section that interests you most.
Table of contents
- How to define your lifecycle stages
- Assign lifecycle stages in HubSpot
- Use lifecycle stages for nurturing
How to define your lifecycle stages
To use lifecycle stages effectively, they have to be clearly defined. If your team doesn’t know the difference between a Sales Qualified Lead (SQL) and a Marketing Qualified Lead (MQL), these representative categories won’t serve any purpose in your CRM.
Before you start using lifecycle stages within HubSpot, your organization will need to document the definitions for each stage that are relevant to your business. These should be easy to use and comprehend. At Raka, we like to start with HubSpot’s standard definitions for lifecycle stages—which provide a logical distinction between each category—and build from there. Here are HubSpot’s definition for each stage in the lifecycle stage property.
HubSpot Lifecycle Stages Definitions
- Subscriber: contacts who know of your business and have opted in to hear more from your team. These are likely visitors that have signed up for your blog or newsletter.
- Lead: contacts who have shown sales readiness beyond being a subscriber. An example of a lead is a contact who signs up for a content offer from your business.
- Marketing Qualified Lead (MQL): contacts who have engaged with the team’s marketing efforts, but are still not ready to receive a sales call. An example of an MQL is a contact who responds to a specific form in a marketing campaign.
- Sales Qualified Lead (SQL): contacts who have indicated through their actions that they are ready for a direct sales follow up. An example of a SQL is a contact who submits a question about your product through a contact form.
- Opportunity: contacts who are real sales opportunities.
- Customer: contacts with closed deals.
- Evangelist: customers who advocate for your business and whose networks may be leveraged for further leads.
- Other: a wildcard stage that can be used when a contact does not fit any of the above stages.
Building on these definitions, we work with clients to provide additional context to their organization. This involves identifying specific criteria within their business offerings that would qualify a contact into each stage. Examples of qualifying criteria include a contact filling out a form, visiting a certain webpage, or booking an appointment with a sales rep. By building contextual definitions for each lifecycle stage, your business will be able to clearly understand how to assign contacts into their appropriate categories—solving the first major lifecycle stage dilemma.

Assign lifecycle stages in HubSpot
Now that you’ve defined your lifecycle stages, it’s time to start applying them in HubSpot. To keep this property updated for contacts in your CRM, you have a few options:
Manually update the lifecycle stage of a given contact
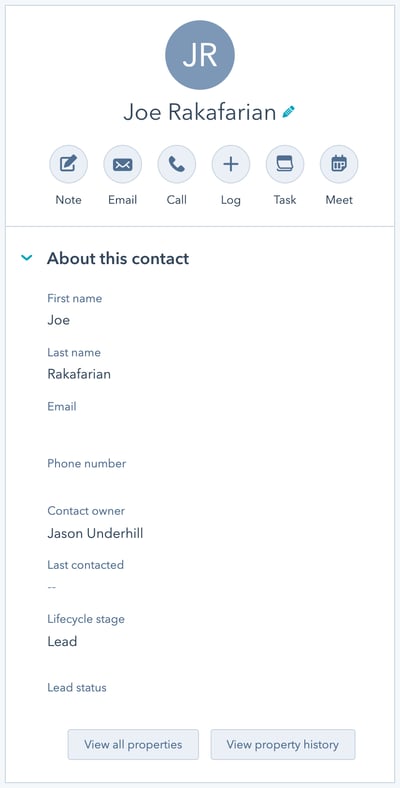
You can update the lifecycle stage property for an individual contact right in their contact record. To do so, follow these steps:
- In your HubSpot account, click the “Contacts” section in the top navigation menu and select the drop-down option “Contacts”.
- From here, search and click the name of the contact you want to edit.
- Once in their contact record, navigate to the “About this contact” section in the left side panel. Then click the lifecycle stage property to edit and make your changes.
- Finally, click Save in the bottom left.
Pretty simple, but remember this solution should only be utilized when you need to update the lifecycle stage of a single contact or a small group. There are much more efficient methods to handle larger updates.
Import to HubSpot to update the lifecycle stage property for a list of contacts
At Raka, we hear this question all the time, “I have a new list of contacts I need to import into HubSpot. How do I make sure they’re assigned an appropriate lifecycle stage?”
This is a common predicament, as most businesses have a constant need to import new contact lists—typically from another software/CRM system or a recent trade show. Fortunately, HubSpot has a built-in feature to address this situation.
If your team needs to classify a list of contacts into a certain lifecycle stage, start by importing the list into HubSpot. As you go through the process, one of the steps will prompt you to set the lifecycle stage for the contacts in the import. You should then be able to select a specific value from a drop-down that will apply that stage to the entire list of contacts.
Use a hidden form field to assign lifecycle stages (professional or enterprise accounts only)
There are many reasons why you’d want to assign lifecycle stages to contacts based on form submissions. Forms are a direct way for contacts to declare their level of interest in your company. If a contact submits a form for a top-of-the-funnel educational download, it’s probably safe to say they are still in the awareness stage of the buyer’s journey and could be classified as a lead. Another contact, who instead fills out a form for a request for a quote, is clearly farther along in the buyer’s journey. This contact now desires a direct follow up from sales and therefore should be classified as an SQL.
Every form you can create in HubSpot has the option to add a hidden field amongst your normal questions. To add a hidden lifecycle stage field, you’ll need to execute the following tasks:
- In your HubSpot account, navigate to Marketing > Lead Capture > Forms.
- Click the name of the form you want to edit or create a new form.
- In the form editor, search for the lifecycle stage field and drag it into the form below the other questions.
- Then, click the pencil icon above the lifecycle stage field to edit.
- In the left pane, select the “make this field hidden” checkbox.
- Next, select the applicable lifecycle stage to be assigned to contacts under the field options section.
- Lastly, click “publish” in the top right.
When employed correctly, this field will never be visible to people filling out the form. After a successful submission, you should also be able to view—in both the contact record and form submission details—that the lifecycle stage has been set to the value you specified in the form.
How to set lifecycle stage using a HubSpot workflow (professional or enterprise accounts only)
This is our preferred method of setting lifecycle stages and keeping them updated in HubSpot. It’s easy, and you essentially get to set it and forget it. Automation is fantastic, isn’t it?
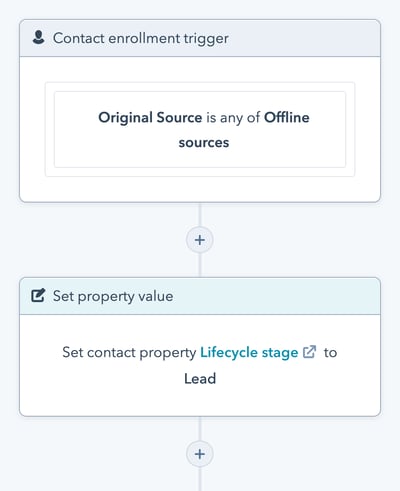
To set up workflows to assign lifecycle stages, you first need to identify pertinent enrollment triggers for each stage. In most cases, you’ll want to allocate a specific lifecycle stage based on qualifying criteria your team has defined as distinctive to a particular stage in your flywheel—such as form submissions, original source, page views, or other contact activity. Ideally, this material would have already surfaced when you defined your lifecycle stages.
Using this information, you can then create workflows in HubSpot to automatically change a contact’s lifecycle stage the moment they meet the given criteria. Here are the steps you need to follow:
- In your HubSpot account, navigate to Automation > Workflows.
- Click “Create Workflow” in the top right.
- On the next screen, choose the “Contact-based” option in the life side menu and the “start from scratch” button in the middle of the screen. Also, be sure to name your workflow during this step.
- Next, you’ll want to set your enrollment triggers for the specific stage your assigning with this workflow (You can toggle through the different property types to find the ones you need).
- After your enrollment triggers have been set, you now need to add actions. Under the enrollment trigger, click the “+” icon to add an action.
- Under the new action, select “Set property value” and choose “Lifecycle stage” under the dropdown menu. This selection will prompt another dropdown to pop up so you can select the specific lifecycle stage to set this property to.
- Finally, click “Review” to turn on.
In the end, you should have something that looks something like this:
We use this method because it’s a comprehensive solution that ensures the lifecycle stage property gets updated appropriately for all contacts in your CRM, in real-time. Just set the automation rules and let HubSpot do the heaving lifting for you.
It’s important to note that HubSpot designed the lifecycle stage property to move forward only. Contacts cannot be assigned a lifecycle stage only to move back to an earlier stage in the process. For example, if one of your forms has a hidden field to set the lifecycle stage to MQL, but the contact filling out the form is already marked as an SQL, the software will not change this lifecycle stage for this contact. To set a lifecycle stage backward, you have to do it manually or in a workflow by clearing the property before setting a new value.
Use them for nurturing
Now that you understand what your lifecycle stages are and have set up processes to apply them to contacts within HubSpot, it’s time to use them for lead nurturing. At Raka, we start by creating active lists for each lifecycle stage. These active lists will automatically update their members based on real-time data and will serve as the base for your nurturing campaigns.
To implement effective nurturing campaigns, you need to think about the types of content that will resonate with contacts in each stage. Every stage represents a different position in the buyer’s journey, so your nurturing content needs to align with where your audience is in their decision process. The content you supply should be actively helping contacts progress to the next stage. Here are some of the general rules we use.
HubSpot lifecycle stages rules
- Subscriber: Subscribers are typically a large pool of contacts and the majority of them will likely never become customers. These contacts are best nurtured by supplying a consistent stream of educational and relevant content through their blog or newsletter subscription. At this stage, the main goal is just increasing your subscriber’s interest in your business’s offerings.
- Lead: Similar to subscribers, leads should be nurtured through providing relevant, engaging content that shows the value and worth of your services—this could include anything from downloadable white papers, guides, e-books, or how-to videos. In the initial stages of the buyer’s journey, content should be strongly branded, establishing a link in the mind of your lead. At this point, you need to make your company the default service to turn to in the minds of your audience.
- Marketing Qualified Lead (MQL): MQLs should be served sales-ready offers such as demos, trials, and prompts for getting in contact with sales. The goal here is to get them to the point where they desire a direct follow up from your sales team.
- Sales Qualified Lead (SQL): Once a contact reaches SQL status, you should set up direct follow ups from your sales team through setting up meetings, calls, or simple email communications. You now need to vet and qualify the contact to see if they are a good fit or actual sales opportunity.
- Opportunity: From here, it’s all about direct communication between the contact and your sales team with the aim of closing the deal.
- Customer: At this stage, supplying information about product updates and cross-selling opportunities may be beneficial.
- Evangelists: Once a contact reaches the evangelist stage, nurturing is best aimed towards gaining referral opportunities from them. Evangelists can be segmented into nurturing campaigns that reward their support and keep them up to date with new developments they can promote on your behalf.
With these key differences in mind, you can create nurturing workflows that cater to each lifecycle stage. Start by triggering your workflows with the active lists you created for each stage. Then, add actions to the workflows to serve people the content they need to make the relevant decisions within their current stage. For example, a nurturing workflow for a lead could feature emails with valuable content offers inside, or for an SQL, your workflow could contain direct follow up tasks for your salesforce.
Automated lead nurturing based on lifecycle stages is a powerful way to create a lasting impression on your audience through providing them the right content at the right time. By being cognizant and accommodating of your contact’s buyers journey, your company will be able to freely move people throughout the flywheel and should ultimately earn more customers as a result.


