In a world of instant gratification, it’s critical to meet your customer’s high expectations. Gone are the days of mail order, of waiting on hold on the phone, of spending hours in the car to make a purchase in person—today’s consumers are fully plugged in and able to get the answers or products they’re searching for immediately.
As a digital agency, it delights us to see consumers and businesses alike wholeheartedly embracing the wonders of modern technology. In particular, we’ve loved watching chatbots evolve over the years, starting off as annoying and rather unhelpful and transforming into an essential tactic of inbound marketing strategies.
If you’ve been hesitant to jump on the chatbot bandwagon, we’re here to help you make that leap with confidence. Chatbots—which include fully automated, partially automated, and live chat—help businesses save time, money, and drive more qualified leads. Plus, they’re simple to build, especially with a platform like HubSpot. Let’s chat chatbots for lead generation and get you on the path to implementing your own.
Table of contents
Why you need a chatbot
What’s not to love about chatbots? They save time and money—in fact, Juniper Research believes that by 2022, chatbots will save businesses an aggregate of over $8 billion per year. Implementing a chatbot could help you save up to 30% of your customer support costs alone, not to mention lost revenue from unhappy customers who aren’t receiving support quickly enough and leaving your site.
Why else should you get a chatbot? Frankly, people really like using chatbots. They’re much faster than trying to get in contact with customer service via phone or email. Even low engagement chatbots see 35-40% response rates from customers, while better bot experiences yield closer to 80-90% response rates. Compare that to email marketing, where open rate averages at 21% for all industries.
Chatbots are also a highly effective lead generation tool for websites. Users engage with them readily, and they act as an instrument for collecting user contact information. Depending on your chatflow setup, you can qualify users as leads, marketing-qualified leads, or even sales-qualified leads effortlessly.

Chatbot best practices
Before we dive into the details of how to build a lead generation chatbot in HubSpot, it’s important to be cognizant of best practices. At the end of the day, you want your chatbot to be helpful, not an annoyance to your website visitors. If your chatbot is giving users the wrong answers to their questions, users will get frustrated quickly.
Use conversational strategy
This is where user experience (UX) design and copywriting merge. You’ll want to build out a detailed flowchart that outlines how a conversation with your chatbot will go from start to finish. Include a friendly welcome message, an error message, and plenty of clickable options to make the bot easier to use. A word of warning—while your chatbot should be conversational, it should be clear that it’s not a human at the other end of the screen. This is misleading to users and can lead to distrust in your brand. Aim to strike a balance in your conversational strategy.
It helps first to identify who your target audience is that will be using this chatbot. This will help you tailor your messaging to the specific wants, needs, and questions of that audience. If you need help identifying your audience, we’ve created a handy buyer persona guide and template you can use.
Pick the right placement
Chatbots don’t need to be present on every page on your site. Instead, choose lower-funnel pages like product pages, pricing, or contact pages to help narrow down the vast pool of users on your site to those with higher purchase intent. This will help you avoid annoying first-time site visitors who are still learning about your business and prevent low engagement rates from users who aren’t qualified yet.
“Place bots on high-intent pages (i.e., pricing pages, feature pages, and demo scheduling pages). Visits to these pages should signal high likelihood a lead is ready to learn more about your offering.” – HubSpot
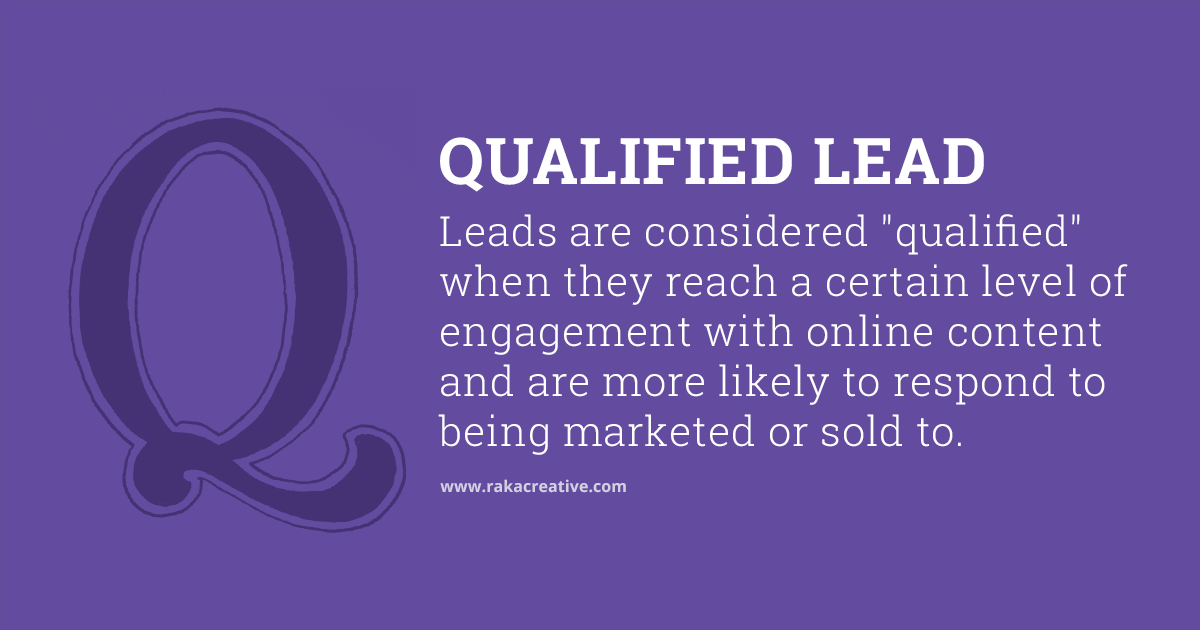
Define MQLs and SQLs ahead of time
The entire purpose of creating a lead generation chatbot is to, well, generate leads. It’s critically important you take time to define what an MQL or SQL looks like to your business before you set up a chatbot. Part of this exercise will be identifying properties that make a user more valuable to your business:
- Are they in your sales territory?
- What’s their budget?
- What’s their timeline?
- How big is their company?
Also, keep your buyer personas in mind as you walk through this process. Use these contact properties to guide what questions to ask in your chatbot to better qualify leads.
Building a HubSpot chatbot for lead generation
Once you’ve defined your buyer personas, your target pages to showcase your chatbot, defined MQLs and SQLs, and flowcharted your chatbot structure, it’s finally time to get cracking in the HubSpot platform.
Build
- Open HubSpot and head to Conversations in the top menu. Click on Chatflows to get started. In this example, you’ll want to create a new chatflow on your website.
- Scroll down to Qualify Leads Bot to get started. If you want to route this chatbot to a different inbox than your general HubSpot inbox, you’ll need to set that up ahead of time in Settings > Tools > Inbox > Inboxes.
- Once you’ve created your chatbot, you’ll notice that the editor is very similar to your flowchart. Take some time to mirror your chatflow in HubSpot to your flowchart plan.
- When you’re satisfied, be sure to preview the chatbot and test it several times, especially if you have conditional if/then branches.
Target
- When you’re done building the workflow, go to the Target tab at the top of the editor. Select which URLs on your website the chatbot should live on.
- You can also opt to add targeting based on user actions, such as CTAs clicked or number of site sessions. This means that the chatbot will appear to anyone who meets this criteria, regardless of URL.
Display
- Customize your chat avatar, display behavior (whether you want a welcome message to appear as a prompt, etc.), and the triggers for the chatbot to pop up (exit intent, etc.).
Options
- Select options such as time delay between message sends, chat session timeout, error message, availability, and more.
Also, don’t forget to check your chat settings. These can be found in Settings > Tools > Inbox > Channels > Chat. Here you can adjust the appearance of the chatbot, choose its placement on the screen, select when the chatbot will be available to users, and more. These settings are more relevant for partially automated or live chat, but it’s worth confirming that everything is the way you want it before you launch your chatbot.
There’s a lot that goes into building an effective lead generation chatbot, so be sure to take your time so you can avoid potential issues down the road. But, once you’re up and running, your business will greatly benefit from the added lead generation tool and savings on customer service.